Configuring the online shop in osCommerce 2
Having installed osCommerce and carried out some initial configurations, we would like to be changing some the contents on the standard boxes on the main pages. For example looking at the default homepage, we can see that there is a header, footer, a right section, a left section and a main section to the page. All these are governed by separate files and if you want to alter any of these, you need to edit these files.
- Go to: http://homepages.shu.ac.uk/~your_username/shop/catalog/admin/ and login using your administration details.
- Click on 'My Store'

- To change the main section of the main page, we need to download the appropriate file and edit it in out favourite text editor. A good one is TextPad. FTP-Login to your homepages and navigate to 'catalog/includes/languages/english/' folder of your installation, download 'index.php', save a copy as back_up and open it in TextPad, make the required changes, save the file as 'index.php' and upload it to the server.
Note: It is a good idea to get into the habit of saving whatever you want to change as back-up just in case you need to revert back to where you started from. For example, in this case having done the download you would then rename the on-the-server 'index.php' file to something like 'index_old.php' before you upload the new version of 'index.php'.
Note: Do not use osCommerce-File manager to edit these files because of the way this causes undesirable changes to these files.
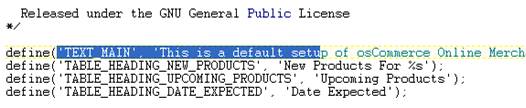
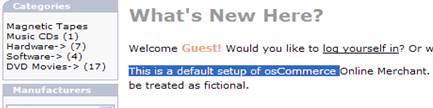
Make sure you leave the quotes. Study the detail in 'TEXT_MAIN' and develop an understanding of how the content and its formatting are put together. Edit
- There is a file called 'column_left.php'. This governs what you see on the left hand side of your page. As in previous step, in order to make changes to this file you need to download and edit it using your favourite test editor. Let us say you need to take out 'Manufacturers' box on the left hand side. In php you can comment out lines of code by inserting '//' at the beginning of the line. Download, edit, upload the file accordingly and view your shop to see the changes. Do also note that the file that governs the Manufacturers box is ' Manufacturers.php' and that if you need to make changes to this box you need to edit that file. You will find the file in 'catalog/includes/boxes/' folder of your installation.

- In creating your site, one of the things you will have to do is to upload your logo to the site to replace the existing osCommerce logo. The existing osCommerce logo is called 'store_logo.png' and you will find it in 'catalog/images/' directory. There are therefore two ways of doing the job. You can upload your logo to this folder and rename your logo ' store_logo.png' to replace the existing logo. Alternatively if you do not do this you would have to make changes to the 'header.php' file in 'catalog/includes/' folder.

- When you open your shop you may want to offer some of the products at a reduced price or in other words you might like to set up specials. Setup specials for a few products in your shop.
- Register a few customers and create orders for the customers.
- One of the back end functionalities that are important is managing customers. When a customer registers at your shop you can edit his details, look up his orders, delete the customer or communicate with him by email. Having logged in as admin, look up the customers you have created and explore how may carry out these functions.
- Create a newsletter for your shop and send it o8ut to your customers. Explore the different types of newsletter. Note that you need to lock a newsletter before sending it to the customers. Also note that for this to work customers should subscribe to newsletter.
- Explore how may email your customers.
- Add a banner to your site.
12. Keeping back up if your data is also very important. Explore how you may create a back up of your back end database and how you might restore your back end database.